
Teaching Remotely Essentials
To help staff prepare for remote teaching we have created the following essential guides to support staff and students in a situation where remote teaching has to take place. These guides have been prepared to cover the basics to help you get started with using Panopto and Blackboard Collaborate to support teaching. You should also ensure (if not already) that all teaching resources are uploaded and available on Blackboard, with additional guidance (where needed) to support independent learning. We have also provided links to tools which can be used to keep in touch (with colleagues and students), which will of course be essential when teaching and learning remotely.
The summary guidance is available below:
Preparing to Teach Remotely on Bb – An Overview | Doc | PDF
Remote Teaching Advice Staff – Doc | PDF
New: Troubleshooting Technical Problems With Online Teaching and Learning – Doc | PDF
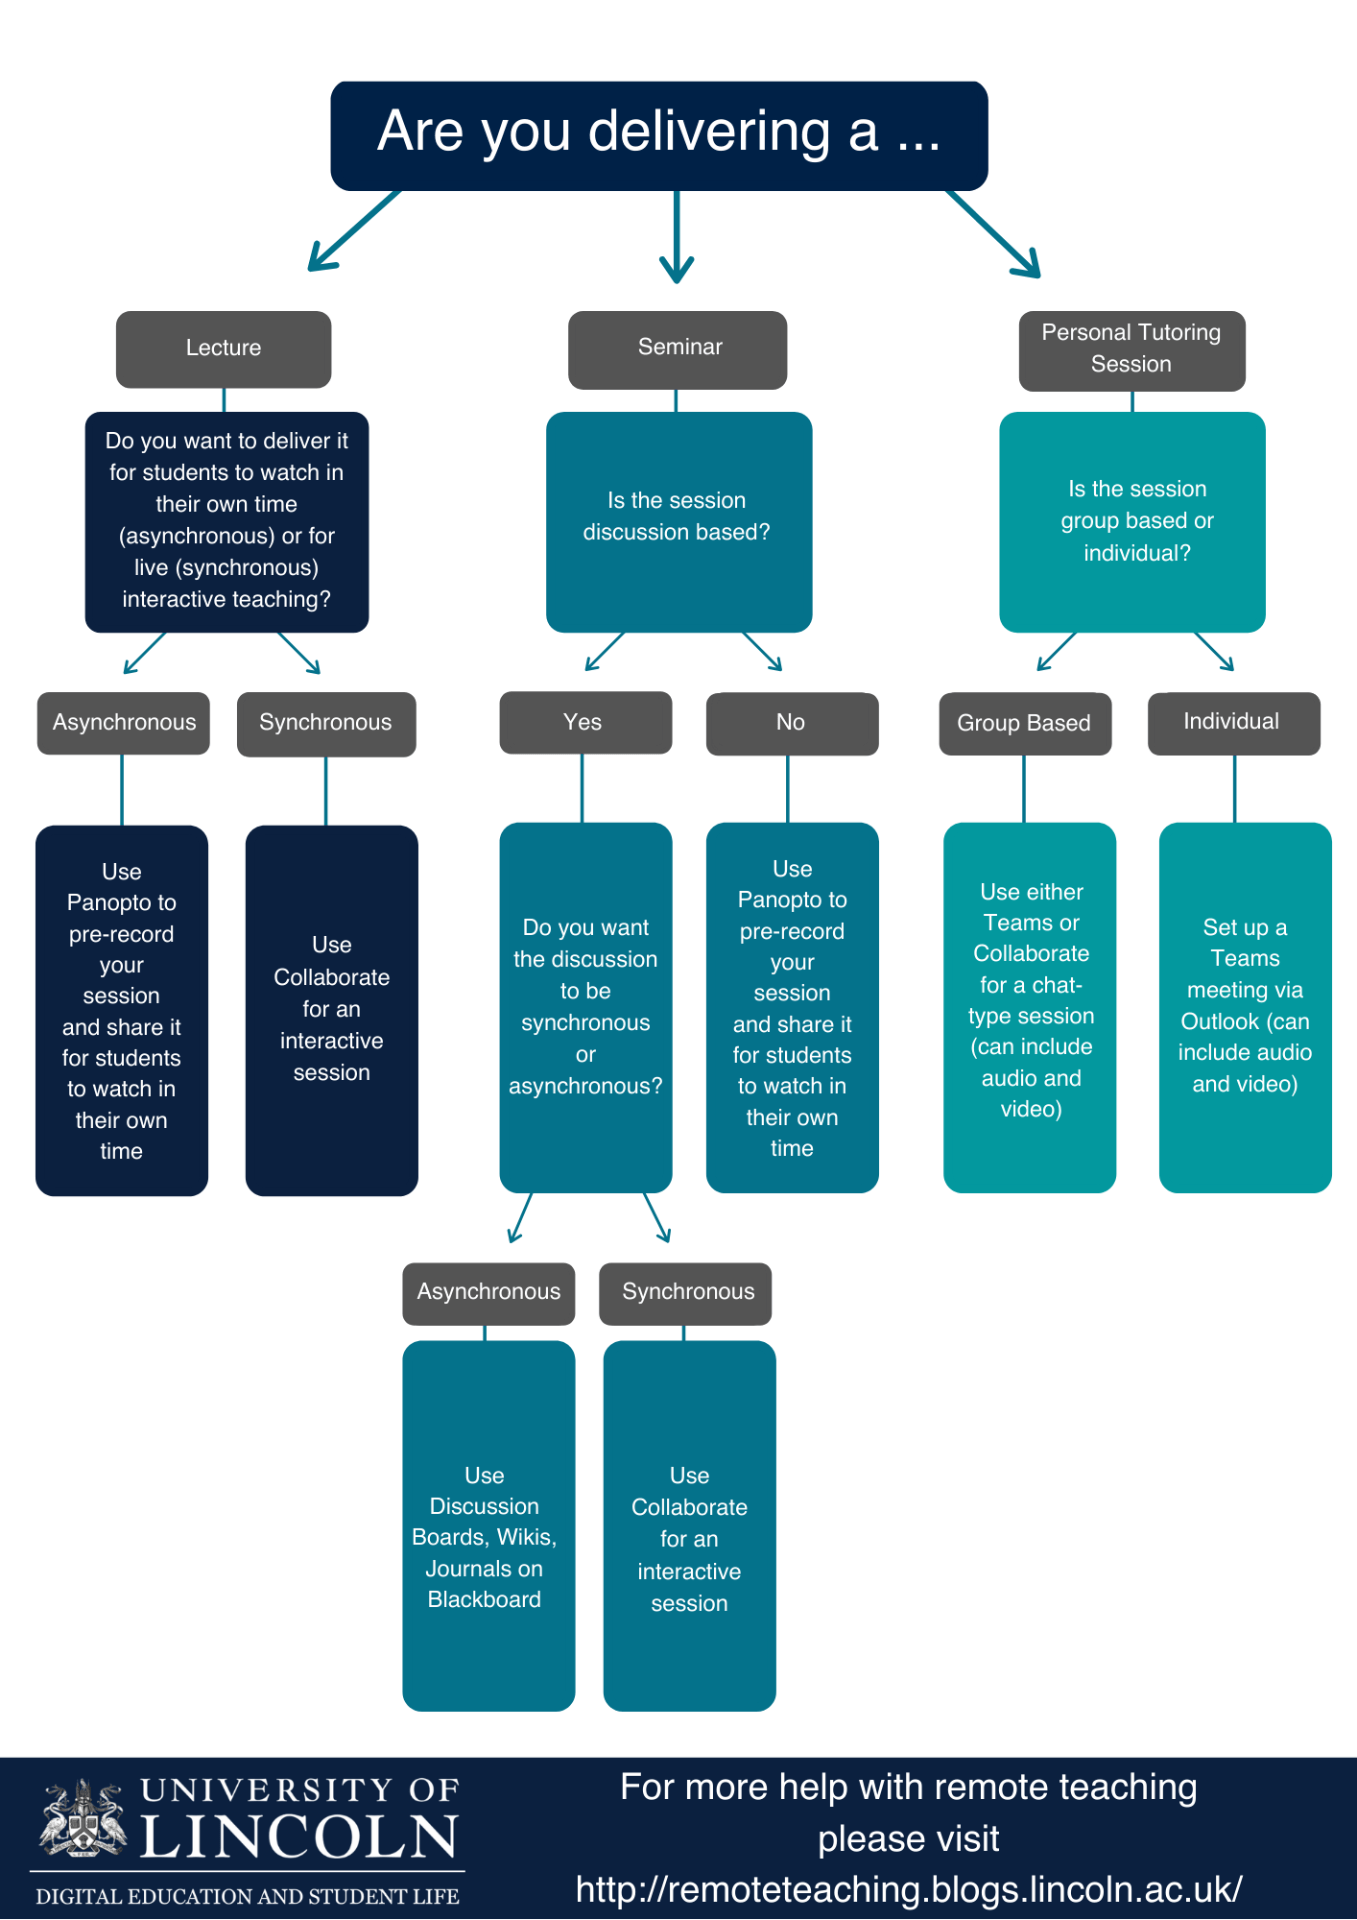
New: We have also produced this flow chart to help guide your decision making when moving to remote teaching. You can download this flow chart as a Image or PDF.
Library support for online teaching – Web
ICT guidance for working at home – Web
For sharing with students
Remote Teaching Advice Students – Doc | PDF
Additional advice
Support Webinars
As you will be aware, we have been running webinars over the last week, on how to teach using Blackboard Collaborate Ultra. If you would like to catch up on these webinars you can find links to the recordings below. The videos are hosted on Panopto and you will need to login to your University of Lincoln account to access them from home. In the coming days we will be advertising webinars on other tools, such as Microsoft Teams and Panopto. Recordings of these webinars will also be available on the links below.
Recordings of the Collaborate Ultra Webinars
Recordings of the Panopto Webinars
Recordings of the MS Teams Webinars
Recordings of the Accessibility Webinars
Delivering Pre-recorded Lectures Remotely Using Panopto (asynchronous teaching)
Panopto can be used on your home or work desktop PC, laptop or tablet to record videos. For recorded lectures, the use of a PC or laptop is recommended.
For best results, a headset with microphone is strongly recommended, but the microphone in your laptop in a quiet location may also be suitable. Clarity of the audio is essential and should be clear and comfortable to listen to. Try not to rush or worry too much about mistakes. A natural relaxed presentation style is more watchable, with or without the odd mistake. Try to avoid spending lots of time trying in making it perfect.
We recommend recording your lectures in advance and posting them on Blackboard at a scheduled time which suits your teaching.
If you are replacing a 60 minute plus teaching session, consider ‘chunking’ your lecture into a series of 10-15 minute (as a guideline) videos covering specific topics or learning points. The videos can then be presented to students as a playlist. Longer videos can be recorded, but a series of shorter videos should be easier to record, whilst also making it a better viewing experience for your students. This will also allow you to intersperse self-directed learning activities or online group work.
Delivering Live Sessions Remotely Using Bb Collaborate Ultra (synchronous teaching)
You can deliver live sessions remotely using Collaborate Ultra within your module site. Every module site at the University can have a Collaborate Ultra room where staff can deliver live teaching sessions. The room can also be used for meetings. An introduction to Collaborate Ultra will help you to prepare for delivery.
Below is a quick guide to using Collaborate Ultra for live session delivery.
- Check that the Collaborate Ultra link is showing on the main navigation bar within your module site. If it is not showing, you can add it by clicking the small plus (+) icon at the top of your navigation bar, choosing: Tool Link > Collaborate Ultra (from the dropdown). Ensure you tick ‘show this link to students’.
- Click the link on the sidebar to open the Collaborate Ultra page. Decide if you are using the Course Room or creating a session.
- The Course Room is an open virtual meeting space for the whole module, accessible at any time.
- Sessions can be scheduled for a specific date and time.
- Click the ellipses (three dots) to the right of the course room and click ‘Join Course Room’.
- Once in the course room, the pop out menu in the bottom right hand corner will allow you to control features.
- ‘Settings’ will allow you to control whether students can share audio, share video, post chat messages.
- ‘Share Content’ will allow you to upload and display presentations or documents, share your screen or ask a poll question.
- Utilise the three icons in the centre of the screen to control your microphone and video to facilitate the session.
- To record your session click the menu in the top left and select ‘Record’.
Personal Tutoring and Student/Staff Meetings using Microsoft Teams
Ms Teams can be used for one to one meetings between staff members and students, such as for Personal Tutoring, Dissertation supervision etc. MS Teams is a very simple and straightforward tool to use for video and audio calling (similar to Skype).
It is best to arrange a suitable date and time for your meeting in the normal way. This will ensure that the student/member of staff you are calling is prepared and ready for your call. Everyone involved will need access to MS Teams and they can follow step 1 below to achieve this.
To start a meeting on MS Teams:
- Open MS Teams from your desktop or use the app on a mobile device. If you don’t have MS Teams installed you can find it in the Software Centre or download from http://365.lincoln.ac.uk.
- Navigate to the ‘Calls’ area by clicking the calls icon on the left navigation bar.
- Navigate to the ‘Make a Call’ box.
- Type in the name of the person you wish to start a meeting or conversation with. You can type their full name, student number or use their email address. Select the correct person and they will be added to the ‘Make a Call’ box.
- Click the phone or camera icon to make an audio or video call.
- If the person you are calling is unavailable, you will get an answer phone message and the person will receive an email telling them that they missed a call from you.
- Once you have started your call, you have access to a variety of features including turning on/off your microphone or video, sharing your screen or uploading documents to the conversation.
- Clicking the ‘show participants’ button inside a call (denoted by an icon of two people) will allow you to add others to the call. For a call featuring more than two person, please call the lead contact first and then add others to the call.
If you are new to MS Teams, there is an introductory course on LinkedIn Learning:
You can study the Communicating Effectively using MS Teams course on LinkedIn Learning
For more information